
I've been away from th is blog for so long that I feel I should just close it but I *might* blog again properly in the future.
For now I'm posting pics at yummyvegandinners-blog.tumblr.com
Come see me there!
Thursday, May 31, 2012
Monday, September 12, 2011
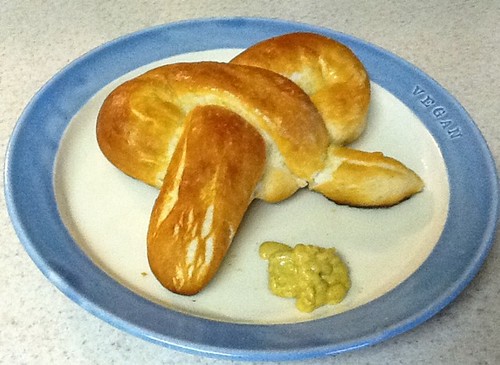
Soft pretzels
Two posts in a row, I know! It'll probably be another year until the next one.
No commentary other than that these were really good and that next time I'll use less flour, less sugar and more salt.
Recipe here.
Wednesday, August 10, 2011
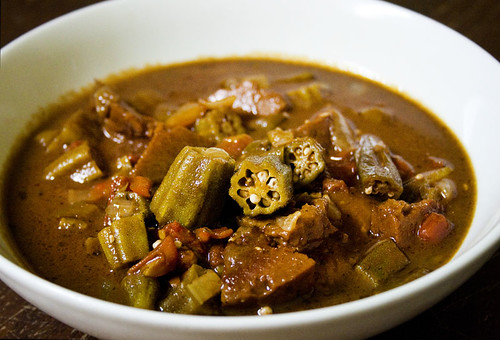
Okra and seitan gumbo
Yes, I know it's been over a year since I posted. A lot has happened this year. Some good, some bad. Not sure if anyone reads this anymore and not sure when I'll update next but here's a dish I made a month ago.
I've posted about gumbo in the past and have made it a few times since that post, but this batch was really awesome. I really should write down recipes but eh, I just always wing it and writing them down as a I go a long takes the fun out of cooking for me.
The key to any good gumbo is a dark roux which can take upwards of an hour to develop on a low flame. The darker the roux, the better the gumbo. We cooked the roux for over an hour with constant stirring.
After the roux was a dark chocolate colour, we added in the holy trinity (onions, celery, green peppers), vegetable stock, seasonings (basic ones: thyme, bay leaf, oregano, salt, pepper, paprika, cayenne), then sliced fresh okra and a heavily spiced homemade seitan andouille (can't remember what I put in it). We added in some tomatoes (which I later found out makes this creole versus cajun), simmered for another hour and then served with rice and hot sauce.
It was so good and I'm sad that okra season is over. I might make gumbo with frozen okra but I'm sure it's not quite the same.
Saturday, June 26, 2010
Scallions!
I know I promised some CSA posts but life, as per usual, has been super hectic. Anyway, in the past few weeks we've received lots of scallions in our CSA share so I thought I'd make a couple of Chinese dishes.

First up, Chinese corn soup. If you like Chinese corn soup, this soup is so fast and so easy that you'll kick yourself for not thinking of it earlier. All you need is a couple of cans of creamed corn, vegetable stock (1 or 2 cans worth), salt, pepper, soy sauce, cornstarch slurry and some garnish. I garnished with scallions, soy sauce and sriracha. I also opted to throw in some shredded soy curls. (Side note: growing up we always had creamed corn in the house for corn soup. It was only until I was older that I even know that creamed corn was eaten as a side dish and not as an ingredient for soup.)
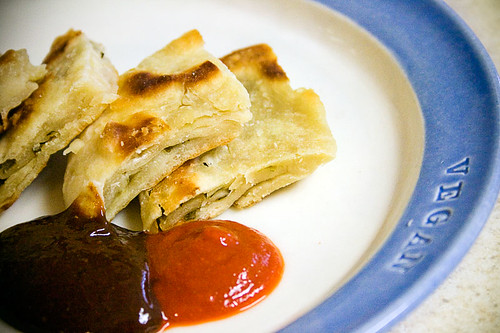
Second, we've got scallion pancakes. I didn't do the best job with making them but they went together quite nicely and totally satisfied my Chinese food craving. Recipes for scallion pancakes are pretty much the same everywhere. I don't use yeast in mine, but I might try this one next time. I serve mine with hoisin sauce and sriracha instead of a traditional dipping sauce. It might seem daunting to make, but it's worth a shot at least once if you like scallion pancakes.
So there you have it, a pretty easy Chinese meal using some great CSA scallions. I received some pretty nifty stuff in my share this week too so hopefully I'll get around to making something interesting.
First up, Chinese corn soup. If you like Chinese corn soup, this soup is so fast and so easy that you'll kick yourself for not thinking of it earlier. All you need is a couple of cans of creamed corn, vegetable stock (1 or 2 cans worth), salt, pepper, soy sauce, cornstarch slurry and some garnish. I garnished with scallions, soy sauce and sriracha. I also opted to throw in some shredded soy curls. (Side note: growing up we always had creamed corn in the house for corn soup. It was only until I was older that I even know that creamed corn was eaten as a side dish and not as an ingredient for soup.)
Second, we've got scallion pancakes. I didn't do the best job with making them but they went together quite nicely and totally satisfied my Chinese food craving. Recipes for scallion pancakes are pretty much the same everywhere. I don't use yeast in mine, but I might try this one next time. I serve mine with hoisin sauce and sriracha instead of a traditional dipping sauce. It might seem daunting to make, but it's worth a shot at least once if you like scallion pancakes.
So there you have it, a pretty easy Chinese meal using some great CSA scallions. I received some pretty nifty stuff in my share this week too so hopefully I'll get around to making something interesting.
Friday, May 28, 2010
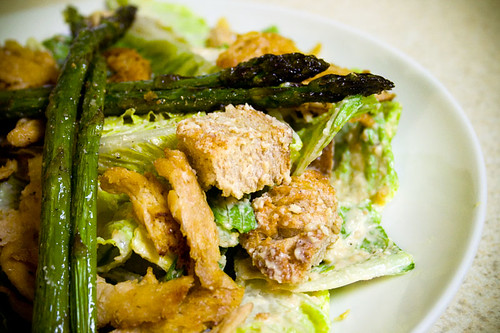
Vegan Caesar, Soy Curls and Asparagus
I have been waiting months for the new CSA season to start and finally this week was the first week. We signed up with the same CSA last year and despite the bad growing season, we really enjoyed our shares.
Our first share this week contained various types of lettuce, asparagus, turnips, radishes and lovely scallions. We've been suffering with terrible grocery store produce all winter so I was delighted to finally get some good produce. But what to make first?
I decided to make a dinner-sized caesar salad with a delicious raw dressing (try it!), homemade croutons, fried and seasoned soy curls and a side of perfectly roasted asparagus.
For the dressing, I play around with the recipe. I usually use all raw cashews or raw cashews and raw almonds, never pine nuts because I don't buy them (they are pricey). I also never have kelp powder so I skip it or just use a bit of nori. The sweetener works also with maple syrup so try that if you don't have agave. And last but not least, I double the garlic. Yum!!
Anyway, the entire meal was the perfect dinner for a very warm spring evening. I'm really looking forward to more meals like this as the days get warmer.
Stay tuned for more CSA food!
Sunday, May 23, 2010
Southeast Asian Inspired Tempeh Wraps

Asian fusion is hot again. Unlike the first wave of Asian fusion many years ago, the focus lately (at least locally) seems to be Vietnamese and Korean fusion. Case in point. A few weeks ago, the Mister brought me home some "Vietnamese Tacos" from Horizons (they previously also served a Vietnamese bruschetta — I've made my own version of these too). They were less like tacos, more like wraps, a bit pricey, but were delicious. Really, anything with Sriracha and Vegenaise is delicious (try it with fries too!). After devouring two pieces, Bebe knocked the rest on the floor in attempt to steal some (he's kind of pushy when it comes to food) so I made a mental note to make my own version.
I didn't want to try and duplicate it at all but instead draw some inspiration from it. I started with some tempeh that I sliced and simmered for about 15 minutes. I drained it and marinated it my usual seasonings that I use for Pad Thai (1/3 cup soy sauce, 1/3 cup lime juice, 1/3 cup brown sugar and 1 tbsp chili garlic paste) and then fried it up and reduced the sauce to a glaze. I served it warm on homemade flatbread/tortillas with shredded carrots, broccoli sprouts and of course Sriracha and Vegenaise with a drizzle of sesame seed oil.
So there you have it. My own version of Southeast Asian tempeh wraps which are super easy to make and totally delicious.
Saturday, March 20, 2010
Vegan Pho with Seitan
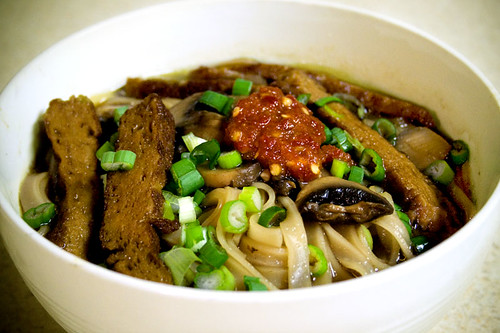
By now, everyone should know what pho is (and banh mi but that'll be a different post in the future). It is either the new(ish) food trend where you live or an old trend going back several years. Wherever it falls on the food trend scale, it is warm, comforting, complex and delicious.
I haven't had vegan pho (or any other Vietnamese food) in three years since I moved from Toronto and I miss it a LOT. Sure, there are restaurants that list "vegetarian" pho, but chances are that the stock is still NOT vegan. So... I steer clear unless it's a vegan or vegetarian restaurant.
Yesterday I couldn't decide what to make for dinner and for some reason, I just wanted pho. Because I can't really get vegan pho here, I had to make it myself. This was the first time making it and it was awesome. My house smelled like a pho restaurant all evening.
I looked at a few different recipes online and saw that they all had a similar formula so I ended up winging it. Some recipes also call for whole cardamom, coriander and fennel, but I just stuck with cinnamon, cloves and star anise. Success! I did deviate a bit from some of the traditional recipes in that I didn't char the onions or strain my broth. I unfortunately did not write down or pay attention to how much I put in of some of the ingredients. I just made it to taste, so here's my blueprint.
- Saute some thinly sliced onion, garlic and ginger.
- Add water (I think I used 6-8 cups), vegan "beef" bouillon powder (half of what was called for with the amount of water I was using since I was adding soy sauce and salt), cinnamon stick (3"), whole cloves (5), star anise (5), Japanese soy sauce, splash of Bragg's, salt, pepper and sugar. Let that come to a boil and add thinly sliced seitan. I put the cloves and the star anise in a tea ball so it was easy to pull out later. I also added in some sliced mushrooms since I had some kicking around.
- Lower heat to a strong simmer and let simmer for about 1 hour uncovered. Take out the cinnamon stick, cloves and star anise. Taste and adjust seasonings.
- Add in rice noodles to the soup and cook until noodles are tender.
- Mound some noodles in a bowl, ladle the soup on top and garnish.
It was easy to make and probably not the best vegan pho in the world, but it was so delicious and easy to make. Definitely going to make this again very soon.
Subscribe to:
Posts (Atom)


