Saturday, September 19, 2009

Farfalle with Roasted Rapini, Tomatoes and Garlic

Farfalle with Roasted Rapini, Tomatoes & Garlic

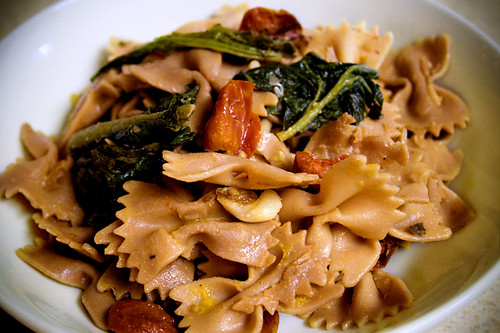
A seemingly simple dish of farfalle tossed with margarine, salt & pepper and roasted rapini, cherry tomatoes and garlic. The vegetables were tossed with olive oil, salt & pepper and then oven roasted at 450F for about 25 mins.

Although it appears super simple, this dish was a little more complicated with subtle extras in the flavour profile.

I utilised two methods that I read about recently on the blog Ideas in Food (warning, blog is not vegan): roasting dry pasta and rehydrating the pasta in cold flavoured liquid prior to cooking. After I read these, I was intrigued and had to try it myself.

The idea behind the roasting is to give the plain pasta more flavour -- a subtle hint of roasty goodness. I don't know why this isn't more popular. After all, we pan toast Israeli couscous before using it and it's technically pasta.

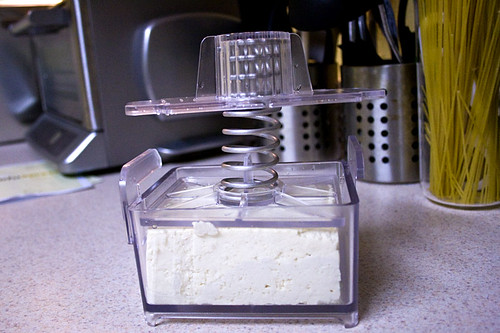
Here I've roasted plain farfalle (not whole wheat) in the oven for about 15 minutes at 350F. I checked it every 5 mins and tossed it around for roasting. I probably could have roasted for 20 minutes but didn't want to burn it because once it starts roasting, it gets roasted pretty fast. Keep reading!

Roasted Farfalle

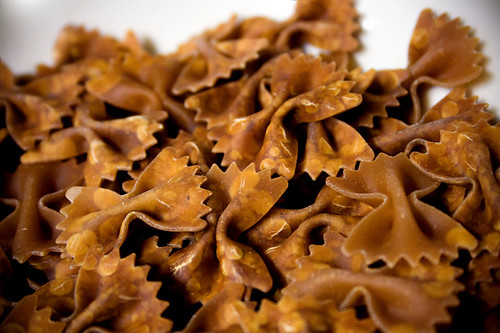
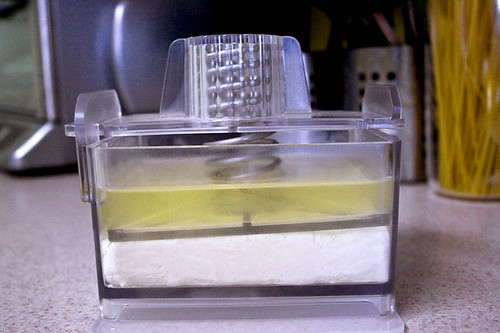
I let the pasta cool for a few minutes and prepared a simple hydrating liquid. I took a can of quality whole tomatoes, mashed it up a bit and strained the juice. I added salt and enough cold water for the amount of pasta needed. The idea behind hydrating is to enable someone to cook the pasta much faster later (soaked pasta only takes a few minutes to cook) which would be great for a restaurant or even a home pasta party. I was less interested in the cooking method and more interested in the flavour infusion. The neat thing is that with cold water, the pasta does not stick since the starches aren't released until heat is added.

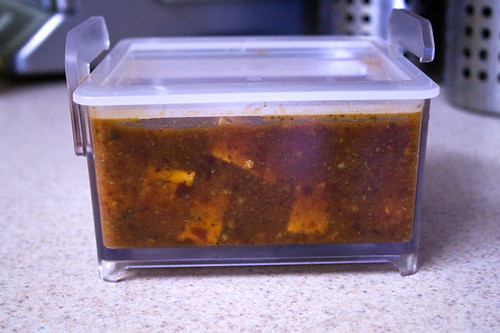
Anyway, I let the pasta soak in the cold liquid for about 1.5 hours. This is how it looked like after soaking. Keep reading!

Soaked Farfalle

I drained the pasta and cooked it in boiling water for about 3 minutes. Then tossed it with margarine, salt, pepper and my roasted vegetables.

The verdict? I could taste the roasted flavours as well as tomato infused in the pasta but it was very subtle. At first I was a bit disappointed because I guess I expected more flavour. HOWEVER, the more I ate, the better it tasted and the more addictive it became.

Even though there are a few extra steps and this takes some planning, I will definitely do the roast & soak pasta methods again and play around more with deeper roasting and other soaking liquids.

Sunday, September 13, 2009

Vegan Burgers... That Don't Fall Apart!

Vegan Burger

There are two types of vegan burgers. The healthy beans/grains/seeds/vegetable kind and then there's the junkie solid patty kind. I prefer the latter.

Most vegans, regardless of burger preference, are always on the hunt for a burger recipe that doesn't fall apart and holds up to the grill or a pan. Some time ago I stopped buying store-bought burgers and buns (and bread) because of the cost, ingredients and taste. I've tried several burger recipes, but this one so far is the best (recipe for patties and buns follows). Here's a cross-section so you can see how compact the patty is -- almost like the commercial brands.

Vegan Burger

The recipe is not mine. I found it on this blog but it is credited to Bryanna Clark Grogan with, I assume, permission to repost (if I'm mistaken, please let me know) . So I am reposting with my own directions and commentary to (hopefully) make it easier to follow, with the credit to this blog and Bryanna Clark Grogan. It is a good base recipe and provides lots of room to customise to your tastes.

If you are going to make this, go ahead and double it and make 8 decent-sized patties. You can freeze them for later use. Also, it is a good idea to make these a day before you want to grill them. Because they need to cool completely before frying or grilling, it is a bit of a hassle to make the same day and then play the waiting game. If you are sensitive to sodium, cut the soy sauce in the cooking liquid. It really seems to permeate the outside of the patties.

Vegan Burger Patties

(Original recipe found here with credit to Bryanna Clark Grogan)

Dry Mix

2/3 cup vital wheat gluten
1/3 cup soy or chickpea flour (I used chickpea flour)
4 tbsp oatmeal / rolled oats
1 tsp dry marjoram
1 tsp onion powder

Wet Mix

2 tbsp soy sauce (I used Japanese soy sauce)
2 tbsp ketchup
1 tbsp sesame seed oil (optional, I used dark toasted sesame oil)
cold water (enough to make 7/8 cup mixed with the soy sauce, sesame oil & ketchup)
1/2 cup dry TVP crumbles rehydrated in 1/3 cup boiling water and then cooled completely

Cooking Broth

1 cup hot water
3 tbsp soy sauce (cut back a bit if you are sensitive to sodium)
1/2 tbsp sesame seed oil (optional)
2 cloves garlic, crushed or minced
  1. Preheat the oven to 325F.

  2. Mix the dry mix ingredients in a large bowl and set aside.

  3. Mix the wet mix ingredients in a separate bowl. Before you mix with the dry ingredients, make sure everything in your wet mix is cold or room temperature, especially the rehydrated TVP. If it is not cold or room temperature, then your final dough/mix will be stringy and unappealing.

  4. Mix the wet mix into the dry mix and knead for a few minutes until the mixture starts to firm up. The more you knead, the firmer it will get since you are developing the gluten. The firmer the dough is, the less likely it will fall apart during cooking.

  5. Form the dough into 4 equal sized patties and put them in an oiled baking dish that is big enough for them to remain one layer and high enough to accommodate the cooking liquid. If you have doubled the recipe, a little overlap is okay. I was able to fit 8 patties with a slight overlap in an extra larger glass lasagna pan.

  6. Mix the cooking liquid ingredients and pour over the patties in the baking dish. Cover the dish with foil and bake for 15-20 minutes. Take them out and flip the patties (be gentle because they are really delicate when half cooked), re-cover with foil and bake for an additional 15-20 minutes. The cooked patties out of the oven should feel a bit firm in the middle but kind of sludgey on the outside because of the cooking liquid. If they still feel a bit doughy and gummy in the middle, throw it back in the oven for another 5 to 10 minutes. Even though they are firmer than when they were raw, they are still pretty delicate until they've gone through the cooling stage.

  7. Set the patties on a plate or pan and COOL COMPLETELY in the refrigerator until cold, preferably overnight. They will be super firm when they are cold.

  8. FINALLY, take your cold patties and fry them or oil them slightly and grill them.
Whew. That was a lot of steps, eh? Trust me, if you're into burger patties like Yves or Boca, this recipe is worth the trouble.

Oh right, I also promised you a bun recipe. The recipe I use for buns is my own combination of a bread recipe in this book and this bun recipe. I'll save my combo recipe for another day. For now, use the bun recipe and split the dough into 8 pieces for 8 buns.

Enjoy!

Tuesday, September 1, 2009

Grilled and Marinated Tofu Tacos

Tofu Tacos

Marinated and grilled tofu on top of homemade flour tortillas and topped with pico de gallo and a side of rice and corn. I know that corn tortillas are more authentic but I have a hell of a time working with masa harina.

The tofu was from my previous post and was marinated in a chipotle adobo citrus marinade and then grilled. The marinade was inspired by the Mexican Smoked Chile Marinade on Recipezaar with very minor changes. I used chipotles in adobo sauce (the recipe doesn't state in adobo but I assumed it was and also used about 8 chiles or so), no orange zest, and added in a few tablespoons of agave nectar for some extra sweetness because I was too impatient to reduce the citrus juices.

The tortillas were basically just 2 cups (white) flour mixed with some salt and 3/4 cup boiling water, kneaded and then formed into a ball and covered with plastic wrap for 30 minutes. Then it was split into 6 portions, rolled or pressed thin and then fried in a dry pan on medium until both sides are cooked and have some brown spots. This only takes a minute or so, depending on how hot your pan is. I didn't bother putting in any oil since we were eating them all in one sitting and not storing any. If you want a softer tortilla and will make extra for the next day, then definitely put in a little oil or vegetable shortening (1 to 2 tbsps should do the trick). Anyway, this wheat flour dough is a really basic dough that can be used for several different things like scallion pancakes, dumpling wrappers or even wheat noodles. Super easy, inexpensive and made with ingredients that pretty much everyone has on hand.

The pico de gallo is something I've been making regularly for the past month to take advantage of all the lovely CSA summer produce. It's just diced onion, tomatoes, red pepper, jalapenos, lime juice, salt, pepper and a sprinkle of sugar. I would have put in cilantro but the boy doesn't really like it and we didn't have any on hand. Also, I generally go light on the jalapenos so that the heat doesn't overpower the sweetness of the other ingredients. So lovely and fresh that I sometimes just eat it straight out of a bowl like a salad.

This meal really tasted like summer. Such a shame that it's already September! Oh well, what can you do?

Lastly, here's a bonus photo of Smuckers. :)

Smuckers

TofuXpress!

Pressed Tofu

Look that lovely tofu. Nicely pressed and compacted with help from the TofuXpress. The result is firm and creamy without all that excess liquid.

I never really thought I would ever buy a tofu press since I really never pressed tofu when I would use it. I would just slice and drain and maybe squeeze out a little liquid and that's it. Then I spotted this post recently by everyone's favourite (and super hip) vegan grandmother, Bryanna Clark Grogan. Bryanna sang her praises for the TofuXpress and I knew I had to have one. It may seem a little pricey but if you eat a lot of tofu, it's worth it. You can't tell by the photos but the unit is well made and very sturdy.

I bought it on the website and a few days later it arrived. Here's a few photos.

Fresh out of the box.

TofuXpress


With 1 package of Nasoya extra firm tofu. If you've had that brand, you know it's really not that firm.

TofuXpress


After a few hours of pressing. Look at all the liquid!

TofuXpress


Sliced and then sitting in marinade (see my next post). The container comes with a lid that you can slap on when you marinate or store in the fridge.

TofuXpress


Anyway, it's a fantastic gadget that is well worth the money and is also very compact to store. If you're looking for a tofu press, this one definitely delivers. I can definitely see myself using it for pressing different things like TVP chunks, soy curls or pieces of seitan. If you're tired of pressing tofu the old fashioned way with plates and weights or paper towels or tea towels, do yourself a favour and get one of these!

For the record, I was not asked to review this nor did I get this for free. I bought and paid for it -- I'm just a happy customer. :)
Blog Widget by LinkWithin