Showing posts with label csa. Show all posts

Saturday, June 26, 2010

Scallions!

I know I promised some CSA posts but life, as per usual, has been super hectic. Anyway, in the past few weeks we've received lots of scallions in our CSA share so I thought I'd make a couple of Chinese dishes.

Chinese Corn Soup

First up, Chinese corn soup. If you like Chinese corn soup, this soup is so fast and so easy that you'll kick yourself for not thinking of it earlier. All you need is a couple of cans of creamed corn, vegetable stock (1 or 2 cans worth), salt, pepper, soy sauce, cornstarch slurry and some garnish. I garnished with scallions, soy sauce and sriracha. I also opted to throw in some shredded soy curls. (Side note: growing up we always had creamed corn in the house for corn soup. It was only until I was older that I even know that creamed corn was eaten as a side dish and not as an ingredient for soup.)

Scallion Pancakes

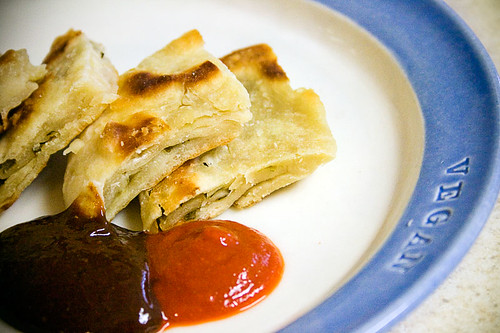
Second, we've got scallion pancakes. I didn't do the best job with making them but they went together quite nicely and totally satisfied my Chinese food craving. Recipes for scallion pancakes are pretty much the same everywhere. I don't use yeast in mine, but I might try this one next time. I serve mine with hoisin sauce and sriracha instead of a traditional dipping sauce. It might seem daunting to make, but it's worth a shot at least once if you like scallion pancakes.

So there you have it, a pretty easy Chinese meal using some great CSA scallions. I received some pretty nifty stuff in my share this week too so hopefully I'll get around to making something interesting.

Friday, May 28, 2010

Vegan Caesar, Soy Curls and Asparagus

Vegan Caesar and Asparagus

I have been waiting months for the new CSA season to start and finally this week was the first week. We signed up with the same CSA last year and despite the bad growing season, we really enjoyed our shares.

Our first share this week contained various types of lettuce, asparagus, turnips, radishes and lovely scallions. We've been suffering with terrible grocery store produce all winter so I was delighted to finally get some good produce. But what to make first?

I decided to make a dinner-sized caesar salad with a delicious raw dressing (try it!), homemade croutons, fried and seasoned soy curls and a side of perfectly roasted asparagus.

For the dressing, I play around with the recipe. I usually use all raw cashews or raw cashews and raw almonds, never pine nuts because I don't buy them (they are pricey). I also never have kelp powder so I skip it or just use a bit of nori. The sweetener works also with maple syrup so try that if you don't have agave. And last but not least, I double the garlic. Yum!!

Anyway, the entire meal was the perfect dinner for a very warm spring evening. I'm really looking forward to more meals like this as the days get warmer.

Stay tuned for more CSA food!

Saturday, September 19, 2009

Farfalle with Roasted Rapini, Tomatoes and Garlic

Farfalle with Roasted Rapini, Tomatoes & Garlic

A seemingly simple dish of farfalle tossed with margarine, salt & pepper and roasted rapini, cherry tomatoes and garlic. The vegetables were tossed with olive oil, salt & pepper and then oven roasted at 450F for about 25 mins.

Although it appears super simple, this dish was a little more complicated with subtle extras in the flavour profile.

I utilised two methods that I read about recently on the blog Ideas in Food (warning, blog is not vegan): roasting dry pasta and rehydrating the pasta in cold flavoured liquid prior to cooking. After I read these, I was intrigued and had to try it myself.

The idea behind the roasting is to give the plain pasta more flavour -- a subtle hint of roasty goodness. I don't know why this isn't more popular. After all, we pan toast Israeli couscous before using it and it's technically pasta.

Here I've roasted plain farfalle (not whole wheat) in the oven for about 15 minutes at 350F. I checked it every 5 mins and tossed it around for roasting. I probably could have roasted for 20 minutes but didn't want to burn it because once it starts roasting, it gets roasted pretty fast. Keep reading!

Roasted Farfalle

I let the pasta cool for a few minutes and prepared a simple hydrating liquid. I took a can of quality whole tomatoes, mashed it up a bit and strained the juice. I added salt and enough cold water for the amount of pasta needed. The idea behind hydrating is to enable someone to cook the pasta much faster later (soaked pasta only takes a few minutes to cook) which would be great for a restaurant or even a home pasta party. I was less interested in the cooking method and more interested in the flavour infusion. The neat thing is that with cold water, the pasta does not stick since the starches aren't released until heat is added.

Anyway, I let the pasta soak in the cold liquid for about 1.5 hours. This is how it looked like after soaking. Keep reading!

Soaked Farfalle

I drained the pasta and cooked it in boiling water for about 3 minutes. Then tossed it with margarine, salt, pepper and my roasted vegetables.

The verdict? I could taste the roasted flavours as well as tomato infused in the pasta but it was very subtle. At first I was a bit disappointed because I guess I expected more flavour. HOWEVER, the more I ate, the better it tasted and the more addictive it became.

Even though there are a few extra steps and this takes some planning, I will definitely do the roast & soak pasta methods again and play around more with deeper roasting and other soaking liquids.

Tuesday, September 1, 2009

Grilled and Marinated Tofu Tacos

Tofu Tacos

Marinated and grilled tofu on top of homemade flour tortillas and topped with pico de gallo and a side of rice and corn. I know that corn tortillas are more authentic but I have a hell of a time working with masa harina.

The tofu was from my previous post and was marinated in a chipotle adobo citrus marinade and then grilled. The marinade was inspired by the Mexican Smoked Chile Marinade on Recipezaar with very minor changes. I used chipotles in adobo sauce (the recipe doesn't state in adobo but I assumed it was and also used about 8 chiles or so), no orange zest, and added in a few tablespoons of agave nectar for some extra sweetness because I was too impatient to reduce the citrus juices.

The tortillas were basically just 2 cups (white) flour mixed with some salt and 3/4 cup boiling water, kneaded and then formed into a ball and covered with plastic wrap for 30 minutes. Then it was split into 6 portions, rolled or pressed thin and then fried in a dry pan on medium until both sides are cooked and have some brown spots. This only takes a minute or so, depending on how hot your pan is. I didn't bother putting in any oil since we were eating them all in one sitting and not storing any. If you want a softer tortilla and will make extra for the next day, then definitely put in a little oil or vegetable shortening (1 to 2 tbsps should do the trick). Anyway, this wheat flour dough is a really basic dough that can be used for several different things like scallion pancakes, dumpling wrappers or even wheat noodles. Super easy, inexpensive and made with ingredients that pretty much everyone has on hand.

The pico de gallo is something I've been making regularly for the past month to take advantage of all the lovely CSA summer produce. It's just diced onion, tomatoes, red pepper, jalapenos, lime juice, salt, pepper and a sprinkle of sugar. I would have put in cilantro but the boy doesn't really like it and we didn't have any on hand. Also, I generally go light on the jalapenos so that the heat doesn't overpower the sweetness of the other ingredients. So lovely and fresh that I sometimes just eat it straight out of a bowl like a salad.

This meal really tasted like summer. Such a shame that it's already September! Oh well, what can you do?

Lastly, here's a bonus photo of Smuckers. :)

Smuckers

Monday, August 31, 2009

Pizza!

Pizza

Sometimes you just don't feel like thinking about cooking and sometimes you need to clean out the fridge. Yesterday was a bit of both.

I had some sauce leftover, 1/2 a package of Cheezly. jalapenos and tomatoes that were super ripe and a few pieces of seitan. So, what better way to use it than to make pizza?

The pizza dough recipe is the No Rise Crust recipe from Recipezaar. I prefer a wetter dough so I cut back on the flour a little bit. Sure, it doesn't have a developed taste like long rising/fermenting doughs but it is quick, easy and pretty good.

So there you have it, a clean-out-the-fridge Sunday dinner. Fast, easy, tasty and so much cheaper (and tastier) than delivery.

Monday, August 17, 2009

Peach Cobbler


Peach Cobbler

Peaches are my favourite fruit. When I was a kid, my dad would get baskets of Ontario peaches from farmers' stands along the highway and I would eat as many as I could in one sitting. I love love love peaches!

Thankfully, we've been receiving quite a lot of peaches from our CSA and lucky for me, the boy (also known as the Mr. sometimes) doesn't care for peaches. More for me! My favourite way to eat peaches is just sliced when perfectly ripe, but I had about four that needed to be eaten today or cooked in something. While I love peach pie, I am absolutely terrible with pastry dough and I really didn't feel like going to the store to buy a pre-made crust. Also, I really don't ever bake anything aside from bread and never make desserts so I was kind of out of ideas aside from pie or jam. I ended up scouring Recipezaar for peach ideas and decided on peach cobbler.

I don't think I've even had peach cobbler or cobbler anything, but it sounded good and easy to make so I modified this recipe. Basically I doubled the peaches, cut the sugar and margarine and used more coconut milk in the dough/batter. Here's the slightly modified version:

Fresh Peach Cobbler


4 large fresh peaches, peeled and sliced
1 cup sugar (1/2 cup for the peaches and 1/2 cup for the batter)
1/4 cup vegan margarine, melted
1 cup flour
2 teaspoons baking powder
1/4 teaspoon salt
1/4 teaspoon nutmeg
1 cup coconut milk (you could use 3/4 soy milk)
  1. Mix peach slices with half the sugar (1/2 cup) and set aside.
  2. Pour the melted margarine into an 8" square or round baking dish.
  3. Mix the dry ingredients: flour, baking powder, salt, nutmeg and remaining sugar (1/2 cup).
  4. Stir in the coconut milk until just combined. The consistency should be like a thick muffin batter. Well I don't know if it should be, but that's how mine was. Add more coconut milk if needed.
  5. Put the batter over the melted margarine, smoothing out as necessary to cover the bottom of the pan.
  6. Top with the peaches including any liquid that has been extracted.
  7. Bake at 375F for 45 minutes.
I thought it turned out really well. The only reason why I used coconut milk was because I was out of soy milk. I think it added a nice richness to it and you really couldn't taste the coconut.

I had it both warm and cold and both ways were delicious! The top and sides were nice and crunchy and the middle under the peaches was cakey with some gooey parts due to the peach juice and margarine. It was so easy to put together with ingredients that I always have on hand and it totally tastes like summer.

ETA: You're going to see this blue plate a lot, not just because we're vegan, but because it literally is the only nice plate I own. The rest are cheapo white dishes from Target. :)

Wednesday, August 5, 2009

Roasted Fennel


I hate the taste of licorice with a passion and I can only tolerate something like anise if it is a minor ingredient. As a kid, I routinely tried to like those licorice candy bits but to no avail. I hated it.

This week's CSA share had two bulbs of fennel. I almost swapped them for something else but I changed my mind because I'd never cooked with fennel before and was curious how it would turn out. I've been told that the licorice flavour becomes more and more subdued as fennel cooks. Because I hate licorice so much, raw in a salad was totally out of the question. I know that some folks put it in soup, but it's so damn hot here that one pot of soup a week is the most I can handle. I really couldn't think of what else to do but oven roast it. Oven roasting is my default for vegetables I've never cooked with or if I am out of ideas. It is actually my favourite way of preparing a lot of things like broccoli, cauliflower and squash. Easy and flavourful.

I cut up the bulb into manageable pieces (sort of looks like artichoke hearts, eh?), drizzled with olive oil, sprinkled with salt, pepper & nutritional yeast and oven roasted at 450F for about maybe 25 mins (can't remember exactly how long) until it was tender, browned and caramelised. I then garnished it with a little bit of the fluffy green tops.

The verdict? It was pretty good with only a hint of licorice. Would I make it again? Maybe for guests who are fans of fennel but probably not for myself. It was fun experimenting though and I was still pleased with the results!

Monday, August 3, 2009

Cabbage & Barley Soup

Cabbage & Barley Soup

When life hands you cabbage, you make cabbage soup!

We've been inundated for the past month with cabbage from our CSA share. I had two more heads left after roasting some and making coleslaw so I decided to make soup tonight.

The soup contains cabbage, onion, garlic, carrots, celery and barley. The base is tomato juice and it is seasoned with a couple of vegetable bouillon cubes, black pepper, vegan worcestershire sauce, sugar, thyme and summer savoury.

I sauteed the aromatics (onion, garlic, celery, carrots) first and then added in the rest of the ingredients. 25 mins in my pressure cooker and it was cooked to perfection and tastes like it was simmering for hours. Yum!

One more head of cabbage to go!

Wednesday, July 15, 2009

Grilled Tofu & Vegetables


Grilled tofu with roasted broccoli & zucchini and a side of roasted red new potatoes.

The tofu was marinated in olive oil, garlic, lemon juice, braggs and Bryanna's broth powder and then grilled on my fancy George Foreman grill. I love that grill!
Blog Widget by LinkWithin